Welcome to 2012! I am thrilled for what this upcoming year holds for my family and look forward to sharing more fun ideas and creations with you. I have spent most of this first day of the new year organizing my scrapbooking paper and CTMH acrylic stamps and I loved looking through all of my stamp sets and seeing all of the beautiful and fun paper I have in my stash. I was thinking though that since the new CTMH catalog will be available on February 1st I should probably sell some of my stamp sets to make room for new ones! By the way…I’ve already received the new catalogs and all I can say is WOW! The new paper packets and stamp sets are terrific and I am looking forward to sharing them with you in February.
Ok, enough dreaming about all of the new stuff…I am here to show you how to make a cute paper basket/bowl that my Mom made for me over the holidays. If you do not already know, I inherited my craftiness from my Mom. She and I both enjoy decorative painting and now both share the love of papercrafting.
For this project you will need:
1 – 9 x 9 inch square of cardstock (I used Typeset from CTMH)
1 – 2 inch metal binder ring
paper scorer (I used my Scor-Pal)
ruler
pencil
hole puncher (the regular round one like you used in elementary school)
First begin with your piece of 9 x 9 cardstock. The side you score will be the bottom of the bowl. My paper has a blue side and a brown side (with letters) – the brown side will be the bottom and the blue side is the inside of the bowl:
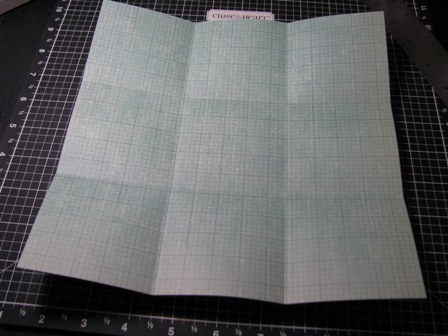
Score the paper every three inches both horizontal and vertical and then flip the paper and crease the seams with your finger or a bone folder to look like this :

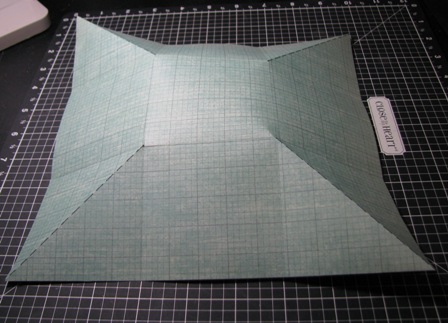
Next, score each of the four corners on the diagonal like this (on the blue side). I used a marker to make a little dot where the crease should begin and used a ruler to draw a line from the corner to the little dot. I then scored the line I drew to make the diagonal crease:
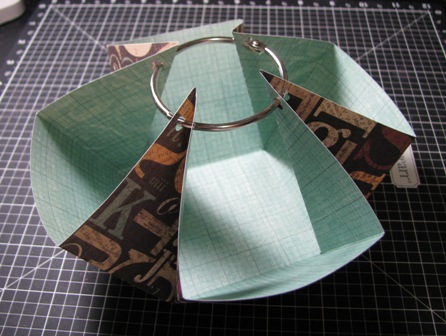
Then flip the paper back over and pinch the corners together and punch holes for the binder rings. Just be sure not to punch too close to the edges so the paper will not tear when you run the binder ring through:
Then run the binder ring through the holes and then you have this cute little bowl!
Now fill it up with some candy or nuts and sit it on the table or give it to a friend! You could even tie ribbons on the binder ring to give it more flair. Let me know if you have any questions and be sure to leave a comment to let me know that you made your own bowl too!


No comments yet.